Charon
SPA blog post - Getting started with Thorgate's SPA project template (???)
(using Django, React, Redux, Redux Saga, Razzle, Docker)
Intro here - we at Thorgate have recently released a new version of our SPA template with Django, React, Redux and Redux Saga.
TODO: Why SPA & trends n stuff
TODO: I assume that you know a little bit about Django and a little bit of React. But since we're going through pretty simple examples, you can follow along.
Even if you don't start using our template, it's a good source of inspiration for your own project set up.
Here is the template:
https://gitlab.com/thorgate-public/django-project-template/tree/spa. This also
includes a more standard Django application template on the master branch.
Quick overview (??)
The template is a cookiecutter template, meaning that it can easily be used
to generate your own project. The following technologies are set up by default:
Django, React, Redux, Razzle for server-side rendering, Docker,
docker-compose for super simple container management, fabric for automating
deploys.
- Django - we are a Python shop/agency
- React
- Redux
- Razzle - server-side rendering by default
- PostgreSQL
- SCSS
- Docker
- Docker-compose
- Fabric - used for deploys
There is more information in the readme.
Getting up and running
Requirements
There are a couple of pre-requisites for generating the project and running it. We use Pipenv for managing Python dependencies and generating projects. If you haven't used Pipenv before, then it is a really nice package manager for Python.
Firstly, make sure that you have pipenv available, it can easily be installed
following the installation instructions on their website. In
order to run the project, we also need Docker and docker-compose. Follow
instructions on how to install those in Docker's
documentation and Docker
Compose's documentation.
For reference, here are the versions of the packages I'm using:
$ pipenv --version
pipenv, version 2018.11.26

$ docker --version
Docker version 18.09.0-ce, build 4d60db472b

$ docker-compose --version
docker-compose version 1.23.2, build unknown
Generating the project
Now that everything is set up, we can generate our project! Clone the project
template anywhere on your file system and make sure to clone the spa branch:
git clone https://gitlab.com/thorgate-public/django-project-template.git -b spa
cd django-project-template
Next, install the dependencies needed to build a new project. This includes
cookiecutter and a few other packages specified in the template's Pipfile.
pipenv install
This installs the packages into a django-project-template-XXXXXXXX virtualenv
that you don't even have to think about -- Pipenv manages all your
dependencies. Finally, we can generate a new project!
Let's activate the virtual environment Pipenv has created for us and navigate to any folder you want the project to be in:
# Still in the django-project-template directory
pipenv shell
cd ~/devel/awesome-projects
Now all that's left is to run cookiecutter to generate the project and answer
some questions about it:
cookiecutter path/to/django-project-template
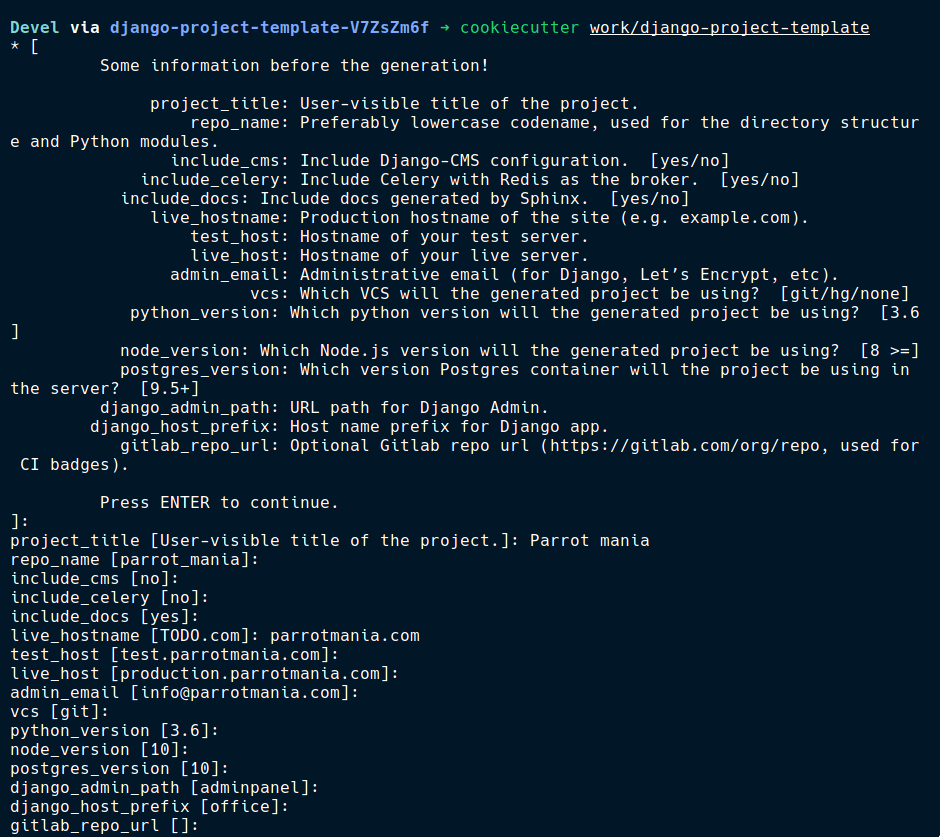
I named my project Parrot-mania as it can be used to save notable parrots.
Now that the project has been generated, we can deactivate the
django-project-template Pipenv environment since it only contains
cookiecutter and a few other packages. You can do this by just running
exit.
Running the generated project
A Makefile is included in the new project with helpers for running common
commands. You don't need to know anything about make or c, they're just
bash commands. The Makefile also includes a set up script that should be
the first thing to run when setting up a new project:
make setup
You can find additional useful make scripts in the readme, or by checking out
the Makefile.
This will create a new Pipenv environment for you, install packages, build the
necessary Docker images, and run initial migrations. In addition, it will ask
you to edit your local Django settings file, just save and close that. If the
settings file opens in vi, then you can save and exit by typing
<Esc>:wq<Enter>.
Now that the project is set up, we can run it through Docker and opening
127.0.0.1:8000 in the browser:
docker-compose up
# or
make docker
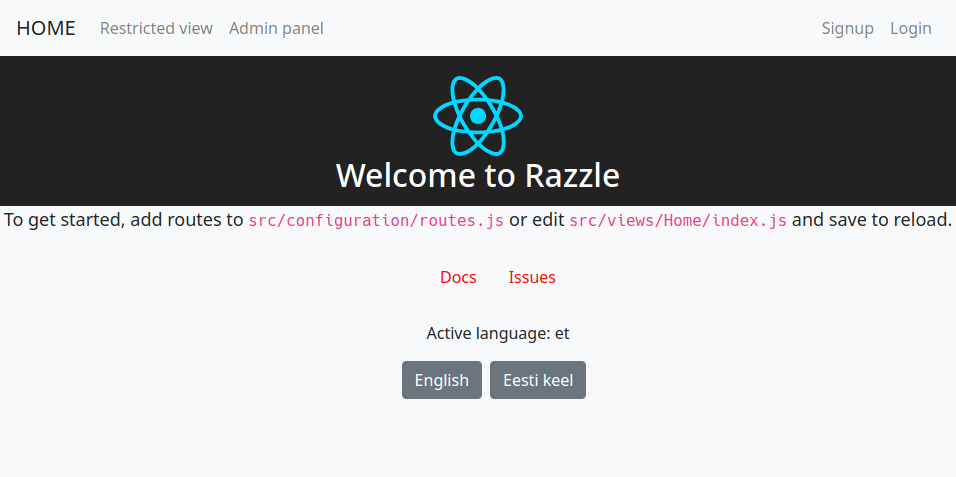
Just like that we have set up a new project with a Django API, a React front-end app with Redux and Redux Saga, server-side rendering using Razzle, and a PostgreSQL database. Since all of these services are running in Docker containers, we didn't need to install much locally.
Overview of the structure
Let's quickly go through the most important files and directories in our new project. First, the top level files and directories look like this:
.
├── app/  - front-end web app
├── parrot_mania/  - back-end Django API
├── docker-compose.production.yml
├── docker-compose.yml
├── Dockerfile-django
├── Dockerfile-django.production
├── Dockerfile-node
├── Dockerfile-node.production
├── Makefile
└── Pipfile
docker-compose and Dockerfile files are used to configure Docker, check
them out if you'd like to know more. Makefile includes useful utilities like
make setup, make makemigrations, and make quality. A more in-depth list
can be found in the README.md and, of course, you can just go through the
Makefile if you'd like a detailed overview of what's there.
The app directory includes these important files/directories:
.
├── package.json
├── razzle.config.js  - Razzle's configuration file
├── SPA.md  - more information about the client app's structure
├── public/
└── src
    ├── components/  - standard React components
    ├── configuration/ - Redux & routes config
    ├── decorators/  - useful higher order components, e.g., loginRequired
    ├── ducks/  - Redux ducks
    ├── forms/  - Formik forms
    ├── sagas/  - Redux Saga sagas
    ├── settings/
    ├── styles
    │   ├── config/  - global variables & Bootstrap config
    │   └── main.scss  - all SCSS files are imported here
    ├── utils/  - useful utilities like translations and PropTypes
    └── views/  - pages
Since the project is based on Razzle, we include razzle.config.js
so that it can easily be configured.
We generally use ducks as a way to bundle together Redux actions, reducers,
and action types. You can read more about ducks here: Ducks: Redux Reducer
Bundles.
Formik is a nice package for building forms in React without the
tears. These forms are located in src/forms. We'll go through a simple example
form together as well.
The backend structure is quite similar to a default Django app.
.
├── accounts/
├── manage.py
├── parrot_mania/
└── settings
    ├── base.py
    ├── local.py
    ├── local.py.example
    ├── local_test.py
    ├── local_test.py.example
    ├── production.py
    ├── staging.py
    └── test.py
The main difference from a default installation are that JWT authentication is already set up, and that Django settings are divided into environment-based configuration files. This means that one can easily use different settings for production, development, and testing.
Don't worry if this seems a bit overwhelming right now, we'll go through some simple examples together.
Our example app
Now that you have a general overview of what the project structure is like, we can start building our small application!
I would like to create a simple Parrot reference web app that can be used to keep track of interesting parrots. Each user can create parrots and see a list of their parrots. We'll make sure that server-side rendering works and make use of some of the interesting technologies included in the project template.
Showing parrots
Let's start with showing the user their saved parrots. Since we already have users and authentication set up, then we don't need to spend too much effort on getting the current user's personal parrots.
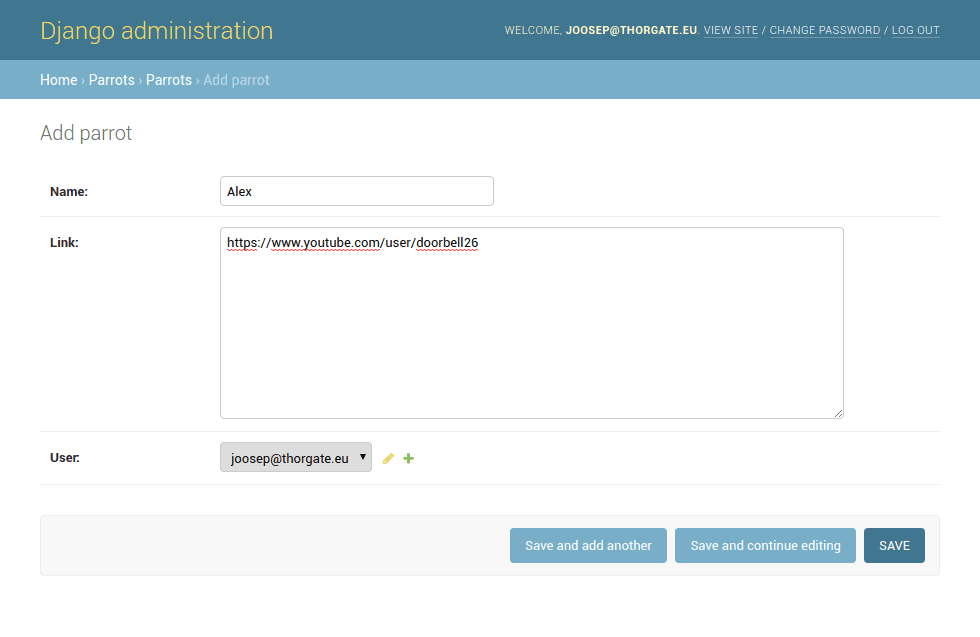
Firstly, it's a good idea to create a superuser account for development. We
would normally call python manage.py createsuperuser to create a superuser in
Django, but since we're running everything inside Docker, then it would be a
bit trickier. Something like this: docker-compose run --rm django python manage.py createsuperuser would do the trick. But who can remember that? In
order to make it easier for everyone, the Makefile includes a useful alias for
running management commands: make docker-manage cmd="createsuperuser". Now we
can either click on "Admin panel" in the navbar or go to
http://127.0.0.1:8000/adminpanel/ to see the Django admin page.
Let's create a new app parrots!
make docker-manage cmd="startapp parrots"
Since the folder is created inside the Docker container, it is possible that its permissions are incorrect. We can easily fix that by running.
sudo chown -R "$(id -un):$(id -gn)" parrot_mania
We will also need to add our newly generated app to our INSTALLED_APPS in
settings/base.py:
INSTALLED_APPS = [
    # Local apps
    'accounts',
    'parrot_mania',
    'parrots',
    ...
]
Now we can add our Parrot model in parrots/models.py:
from django.db import models

from accounts.models import User


class Parrot(models.Model):
    name = models.CharField(max_length=255)
    link = models.TextField()
    user = models.ForeignKey(User)
And let's register the Parrot model to our admin site in parrots/admin.py
as well:
from django.contrib import admin

from parrots.models import Parrot


admin.site.register(Parrot)
And let's migrate our database using aliases from the Makefile:
make makemigrations
make migrate
Now we can add parrots through the Django admin!
The next step is to create a page on the front-end where we will show the
parrots. At first, let's use some dummy data so that we can focus on just
React. Create a file at app/src/views/ParrotsList.js:
import React from 'react';
import { Container } from 'reactstrap';

import withView from 'decorators/withView';

const exampleParrots = [
    { id: 1, name: 'Alex', link: 'https://www.youtube.com/user/doorbell26' },
    { id: 2, name: 'Benjamin', link: 'https://www.youtube.com/user/parrotpost' },
];

const ParrotsList = () => (
    <Container>
        <h1>Here are your parrots!</h1>
        <ul>
            {exampleParrots.map((parrot) => (
                <li key={parrot.id}>
                    <a href={parrot.link}>{parrot.name}</a>
                </li>
            ))}
        </ul>
    </Container>
);

export default withView()(ParrotsList);
But how do we say that this is an actual page that React will render on a
specific URL? Well, we need to specify this in the src/configuration.routes.js
file.
Add the following object towards the end of the existing routes, just above the
last NotFoundRoute:
...
{
    path: '/parrots',
    exact: true,
    name: 'parrots-list',
    component: ParrotsList,
},
NotFoundRoute,
We also need to import the component though, so let's add this to the top of the file:
const ParrotsList = loadable(() => import('views/ParrotsList'));
This funny import handles code-splitting and dynamically loading only necessary JavaScript for the page that the user is currently on.
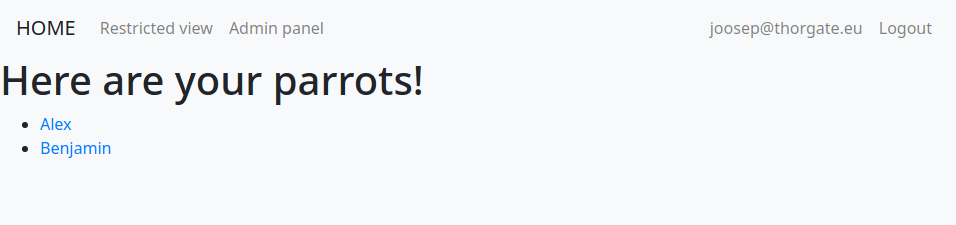
Now we can navigate to http://127.0.0.1:8000/parrots and see our example
parrots!
This is a good time to make sure that our server-side rendering works, we can
curl the /parrots page:
curl http://127.0.0.1:8000/parrots

...
<h1>Here are your parrots!</h1>
...
Even though the HTML is minified, we can see that includes our example parrots and their links.
So far it has been a pretty standard Django and React application, but now that we need to show dynamic data to the user, we need communication between the server and the client. Let's first do this by just standard HTTP requests and then bring in Redux Saga later.
Firstly, we need an API endpoint to fetch parrots. Using Django Rest Framework,
it is possible to set up API endpoints very quickly. Let's create our DRF
serializer in parrot_mania/parrots/serializers.py:
from rest_framework import serializers

from parrots.models import Parrot


class ParrotSerializer(serializers.ModelSerializer):
    class Meta:
        model = Parrot
        fields = ('id', 'name', 'link')
And our viewset in parrot_mania/parrots/views.py:
from rest_framework import viewsets
from rest_framework.permissions import IsAuthenticated

from parrots.models import Parrot
from parrots.serializers import ParrotSerializer


class ParrotViewSet(viewsets.ModelViewSet):
    queryset = Parrot.objects.all()
    serializer_class = ParrotSerializer
    permission_classes = [IsAuthenticated]

    def get_queryset(self):
        return super().get_queryset().filter(user=self.request.user)
And register the viewset's URLs using Django Rest Framework's router in
parrot_mania/parrots/urls.py:
from rest_framework import routers

from parrots.views import ParrotViewSet


router = routers.SimpleRouter()
router.register(r'parrots', ParrotViewSet, base_name='parrots')
urlpatterns = router.urls
And finally include these URLs in parrot_mania/parrot_mania/rest/urls.py
urlpatterns = [
    ...
    url(r'^', include('parrots.urls')),
]
We can test it out with curl if we remove the authentication check and
current user filtering:
class ParrotViewSet(viewsets.ModelViewSet):
    queryset = Parrot.objects.all()
    serializer_class = ParrotSerializer
    # permission_classes = [IsAuthenticated]

    # def get_queryset(self):
    #     return super().get_queryset().filter(user=self.request.user)
http://127.0.0.1:8000/api/parrots/

[
    {"id":1,"name":"Alex","link":"https://www.youtube.com/user/doorbell26"},
    {"id":2,"name":"Benjamin","link":"https://www.youtube.com/user/parrotpost"}
]
We need to get this data to our front-end though. At first, let's try to do
this with a simple fetch request:
import React, { Component } from 'react';
import { Container } from 'reactstrap';

import withView from 'decorators/withView';

class ParrotsList extends Component {
    state = {
        parrots: [],
    };

    componentDidMount() {
        fetch('/api/parrots')
            .then((res) => res.json())
            .then((parrots) => {
                this.setState({ parrots });
            });
    }

    render() {
        return (
            <Container>
                <h1>Here are your parrots!</h1>
                <ul>
                    {this.state.parrots.map((parrot) => (
                        <li key={parrot.id}>
                            <a href={parrot.link}>{parrot.name}</a>
                        </li>
                    ))}
                </ul>
            </div>
        );
    }
}

export default withView()(ParrotsList);
The problem here though, is that the parrots do not get server-rendered anymore
since they are fetched in componentDidMount -- when the component has been
rendered on the client side. In order to fix this, you can write your first
Saga. A saga listens to any dispatched Redux actions and can react to them --
for example, dispatching more actions or making API requests. In our SPA
projects, all communication with the API goes through Sagas.
The saga we will write will be very simple. It's going to be called whenever
anyone navigates to the /parrots route. In addition, it will be called on the
server whenever the user initially navigates to the /parrots route.
At first, let's just log something to the console so that we see that it's
working. Create a app/src/sagas/parrots directory and a fetchUserParrots.js
file inside it with the following contents (make sure not to miss the * next
to function).
export default function* fetchUserParrots() {
    console.log('Fetching some parrots!');
}
We also need to configure this saga to be triggered whenever users visit the
/parrots page. In order to do that, we can import the saga and modify our
route configuration in configuration/routes.js:
import fetchUserParrots from 'sagas/parrots/fetchUserParrots';

...

{
    path: '/parrots',
    exact: true,
    name: 'parrots-list',
    component: ParrotsList,
    initial: [
        fetchUserParrots,
    ],
},
Now we should see the logged message in the console.
Sagas offer a way of handling side effects in Redux projects (like API requests) which are easy to manage and test. Redux Saga has a nice introduction on their site at https://redux-saga.js.org.
In our project template, the sagas specified in the initial array for each
route are executed whenever a user visits the route. They're also executed on
the server-side so that data can be fetched on the server and returned to the
user when they first query the page.
TODO: This is probably a good time to explain SSR? With some nice graphics
Now that we have a function that's triggered when the user queries /parrots,
we can add API request logic there. But before that, let's create a Redux duck
for containing the parrots. Create the app/src/ducks/parrots.js file and add
the following:
import { combineReducers } from 'redux';

export const RECEIVE_PARROTS = 'parrots/RECEIVE_PARROTS';

const parrotsReducer = (state = [], action) => {
    switch (action.type) {
        case RECEIVE_PARROTS:
            return action.parrots;

        default:
            return state;
    }
};

export default combineReducers({
    parrots: parrotsReducer,
});


// Action creators

export const receiveParrots = (parrots) => ({
    type: RECEIVE_PARROTS,
    parrots,
});
We also need to configure our application to use the parrots duck. We can do
that in configuration/reducers.js:
import parrots from 'ducks/parrots';

export default (history) => combineReducers({
    ...
    parrots,
});
Finally, we can connect the ParrotsList component to the Redux store:
import React from 'react';
import { Container } from 'reactstrap';
import { connect } from 'react-redux';

import withView from 'decorators/withView';

const ParrotsList = ({ parrots }) => (
    <Container>
        <h1>Here are your parrots!</h1>
        <ul>
            {parrots.map((parrot) => (
                <li key={parrot.id}>
                    <a href={parrot.link}>{parrot.name}</a>
                </li>
            ))}
        </ul>
    </Container>
);

const mapStateToProps = (state) => ({
    parrots: state.parrots.parrots,
});

const ParrotsListConnector = connect(
    mapStateToProps,
)(ParrotsList);

export default withView()(ParrotsListConnector);
It is now possible to dispatch RECEIVE_PARROTS actions with some parrots and
see them. Let's quickly try this out without any API requests just to make sure
everything works alright. Edit the fetchUserParrots saga:
import { put } from 'redux-saga/effects';

import { receiveParrots } from 'ducks/parrots';

export default function* fetchUserParrots() {
    yield put(receiveParrots([
        { id: 1, name: 'Alex', link: 'https://www.youtube.com/user/doorbell26' },
        { id: 2, name: 'Benjamin', link: 'https://www.youtube.com/user/parrotpost' },
    ]));
}
And we should now be able to see the hard-coded parrots again! We dispatch the
RECEIVE_PARROTS action using put. The next thing to do is to make an API
request to retrieve the user's parrots and dispatch the action using those
parrots instead.
We could use fetch to make this API request, but we have a helper library for
making API requests called tg-resources (which uses fetch or superagent
under the hood). Using tg-resources, we can configure a "resource" that can be
used to easily make API calls. Let's configure the parrotsList resource in
services/api.js. In the createSagaRouter arguments, add the parrots
resource like so:
const api = createSagaRouter({
    ...
    parrots: {
        list: 'parrots/',
    },
}, {
    ...headers, apiRoot settings, etc.
});
We can now make use of this resource in the fetchUserParrots Saga:
import { put } from 'redux-saga/effects';

import { receiveParrots } from 'ducks/parrots';
import api from 'services/api';

export default function* fetchUserParrots() {
    try {
        const parrots = yield api.parrots.list.fetch();
        yield put(receiveParrots(parrots));
    } catch (err) {
        console.error('Something went wrong!');
    }
}
We call the fetch method on the api.parrots.list resource triggering a GET
request to /api/parrots/. Similarly, we could use post to make a POST
request with some data.
A simple way to check if server-side rendering works is to right click on the page and selecting "View Page Source". The saved parrots should show up in the original HTML the server sends to the browser.
TODO: Explain generators and yield?
Creating parrots
Currently, the only way to add parrots is via the admin page. This is a bit of a problem since then only admin users can add parrots. Also, it's quite inconvenient to navigate to the "add a parrot" admin page. So, let's create a new view with a form for creating parrots.
Let's add a simple non-functional form view to views/CreateParrot.js:
import React from 'react';
import { Form, FormGroup, Label, Input, Button, Container } from 'reactstrap';

const CreateParrot = () => (
    <Container>
        <h1>Add a new parrot!</h1>
        <Form>
            <FormGroup>
                <Label for="name">Name</Label>
                <Input name="name" id="name" />
            </FormGroup>
            <FormGroup>
                <Label for="link">Link</Label>
                <Input name="link" id="link" type="url" />
            </FormGroup>
            <Button>Create</Button>
        </Form>
    </Container>
);

export default CreateParrot;
And add a route for it in configuration/routes.js:
const CreateParrot = loadable(() => import('views/CreateParrot'));
...
{
    path: '/parrots/create',
    exact: true,
    name: 'create-parrots',
    component: CreateParrot,
},
You should see a page like this at /parrots/create:
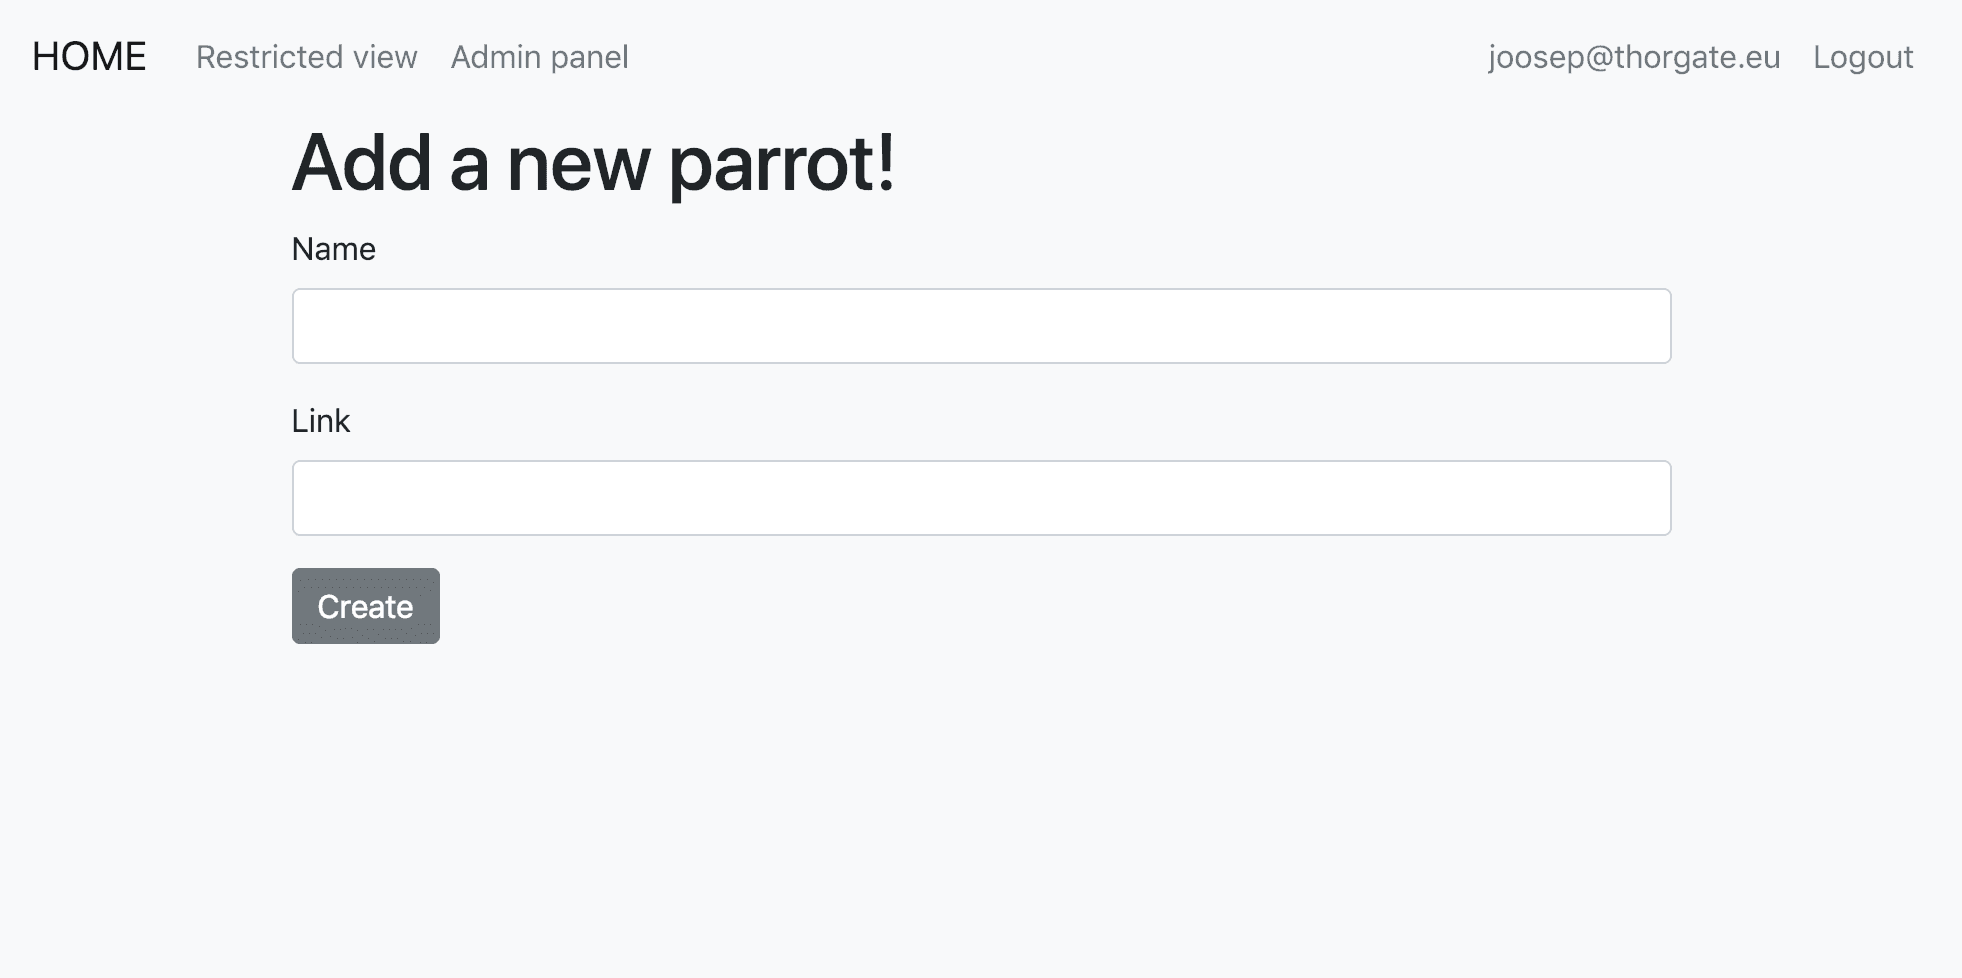
Unfortunately, we don't currently have access to any field values that the user inputs. One option would be to convert the component to a class component and keep track of the name and the link in the component's state. Another option would be to use refs and manually query the name and link inputs for their values when the user submits the form.
Those solutions require a lot of manual work though (especially for larger forms). So, let's use a package that makes forms in React a breeze: Formik. We can convert our component to use Formik like so:
import React from 'react';
import { FormGroup, Label, Input, Button, Container } from 'reactstrap';
import { Formik, Form } from 'formik';

const CreateParrot = () => (
    <Container>
        <h1>Add a new parrot!</h1>
        <Formik
            initialValues={{ name: '', link: '' }}
            onSubmit={(values) => {
                console.log('Submitting!', values);
            }}
        >
            {({ values, handleChange }) => (
                <Form>
                    <FormGroup>
                        <Label for="name">Name</Label>
                        <Input
                            name="name"
                            id="name"
                            value={values.name}
                            onChange={handleChange}
                        />
                    </FormGroup>
                    <FormGroup>
                        <Label for="link">Link</Label>
                        <Input
                            name="link"
                            id="link"
                            type="url"
                            value={values.link}
                            onChange={handleChange}
                        />
                    </FormGroup>
                    <Button type="submit">Create</Button>
                </Form>
            )}
        </Formik>
    </Container>
);

export default CreateParrot;
Formik keeps track of the form's state internally and uses a render props based API to allow us to access the state and modify it. It is very simple to add validation, showing validation errors, and handling server errors. Even things like disabling the submit button when the user has clicked it is very simple.
You should now see a message logged to the console with the values you inputted.
Now, we need to send this data to the server so that the server can store the
parrot in the database. A very simple way to do it would be to just send a fetch
request in the onSubmit handler, but let's use a Saga for that.
Let's add a createParrot.js file to sagas/parrots/ with the following
contents:
import { takeEvery } from 'redux-saga/effects';


const CREATE_PARROT = 'CREATE_PARROT';

export const createParrot = (name, link) => ({
    type: CREATE_PARROT,
    name,
    link,
});

function* createParrotSaga(createParrotAction) {
    console.log('create parrot:', createParrotAction);
}

export default function* createParrotWatcher() {
    yield takeEvery(CREATE_PARROT, createParrotSaga);
}
This saga specifies its own action that it can react to -- CREATE_PARROT. The
createParrotWatcher will be watching for any dispatched CREATE_PARROT
actions and run createParrotSaga passing it the action as the argument.
Currently we're just logging the createParrotAction in order to make sure that
we get passed the correct data. Let's configure this Saga to "watch" for any
actions dispatched in the /parrots/create route by adding it as the watcher
for that route in routes.js:
{
    path: '/parrots/create',
    exact: true,
    name: 'create-parrots',
    component: CreateParrot,
    watcher: createParrotWatcher,
},
And finally, let's connect our CreateParrot component to Redux:
...
import { connect } from 'react-redux';

import { createParrot } from 'sagas/parrots/createParrot';

const CreateParrot = ({ createParrot }) => (
    <Container>
        <h1>Add a new parrot!</h1>
        <Formik
            initialValues={{ name: '', link: '' }}
            onSubmit={(values) => {
                createParrot(values.name, values.link);
            }}
        >
            ...
        </Formik>
    </Container>
);

const mapDispatchToProps = (dispatch) => ({
    createParrot: (name, link) => dispatch(createParrot(name, link)),
});

const CreateParrotConnector = connect(
    null,
    mapDispatchToProps,
)(CreateParrot);

export default CreateParrotConnector;
Now, whenever the form is submitted, we dispatch the CREATE_PARROT action
passing it the name and the link.
We should now see the logged message in the console with the
createParrotAction including the specified name and link.
We can now send a POST request to the server using our parrots.list resource:
...
import api from 'services/api';

...

function* createParrotSaga(createParrotAction) {
    try {
        const { name, link } = createParrotAction;
        yield api.parrots.list.post(null, { name, link });
    } catch (e) {
        console.log('Something went wrong!');
    }
}

...
This almost works. We aren't currently sending the user_id field to the
server, but since it's required, we get a 500 error saying that the user_id
field cannot be null. It would be great if we didn't need to send this
user_id manually, but instead, Django would take the authenticated user and
save the parrot to the database with that user's ID.
We can accomplish this very easily by overriding the perform_create method on
the ParrotViewSet and passing the currently authenticated user to the
serializer:
class ParrotViewSet(viewsets.ModelViewSet):
    ...

    def perform_create(self, serializer):
        return serializer.save(user=self.request.user)
Creating parrots should now work! However, we don't actually see anything
happening. Let's redirect the user to /parrots once the request has finished.
In the createParrot Saga, modify the createParrotSaga function like so:
import { push } from 'connected-react-router';
import { takeEvery, put } from 'redux-saga/effects';
...

function* createParrotSaga(createParrotAction) {
    try {
        const { name, link } = createParrotAction;
        yield api.parrots.list.post(null, { name, link });

        yield put(push('/parrots'));
    } catch (e) {
        console.log('Something went wrong!');
    }
}

...
Let's also add a link to /parrots/create to our ParrotsList component:
...
import { Link } from 'react-router-dom';
...
const ParrotsList = ({ parrots }) => (
    <Container>
        <h1>Here are your parrots!</h1>
        <Link to="/parrots/create">
            Add a new parrot!
        </Link>
        ...
    </Container>
);
Full source of Parrot-mania
You can check out the full source of Parrot-mania here: https://github.com/JoosepAlviste/parrot-mania
Future improvements to the template
- Kubernetes
- Out-of-the-box testing set up with
react-testing-library - GraphQL (???)